Units in EMTL
EMTL simulates Maxwell's equations without coefficients \(\epsilon_0\), \(\mu_0\), \(c\) and \(4\pi\). Therefore units for field are different from CI. However, it does not make any difficulties, since all you need to compute (transmission, scattering cross section etc.) is expressed as ratio between measured and incident fields.
Light speed in vacuum is unity, therefore frequency \(f=1/\lambda\) (for example, frequency 10 corresponds to wavelength 0.1). Unit of time is time used by light to cover the unit of length.
Using EMTL
To use EMTL functions you should include file uiexp.h to your code:
#include "uiexp.h"
EMTL should be initialized with command line arguments
    int main(int argc, char **argv){
            emInit(argc,argv);
            ... // your code
    return 0;
    }
Function emInit has 3rd and 4th optional arguments. You can specify directories for output text files and auxiliary binary files there. These arguments are empty strings by default (this means that all files are recorded to directory with your executable file).
Media
Medium is constructed by class emMedium. Constructor arguments are dielectric permittivity \(\varepsilon\), conductivity \(\sigma\), magnetic permeability \( \mu \) and magnetic losses \( \sigma *\). Their default values are 1, 0, 1, 0.
Unlike frequency domain methods, the dielectric permittivity \(\varepsilon(\omega)\) of dispersive materials in tabular form cannot be directly substituted into the FDTD scheme. Instead, it can be approximated using multiple Drude or Lorentz terms in the form:
where \(\varepsilon_{\infty}\) is permitivitty at infinite frequency, and \(\omega_p\), \(\gamma_p\), \(\Delta \gamma_p'\), \(\Delta \varepsilon\) are fitting coefficients that do not necessary have a physical meaning. Zero \(\gamma'\) values corresponds to conventional Drude and Lorentz form. Sometimes nonzero \( \gamma'\) value helps to make better fitting for given \(\varepsilon(\omega)\) while conventional Drude and Lorentz form fails (see details here).
This is example for gold ( \(\gamma'\) is zero)
    emMedium m(5.4);
    m.AddPolarizability(emDrude(.14*1e17,.103*1e+15/2,1));
    m.AddPolarizability(emLorentz(.427*1e+16,.87*1e+15,2.54*.268));
    m.AddPolarizability(emLorentz(.523*1e+16,1.32*1e+15,2.54*.732));
    m.calibrate(1/(299792458*1e+6));
Parameters for Drude and Lorentz constructors are \( \omega_0\), \( \gamma\), \(\Delta \varepsilon \) and \( \gamma'\). Default value of \( \gamma'\) is zero.
In our example we use data from here. In this work dimension of parameters \( \omega_0\), \(\gamma\) is \(\frac{radian}{second}\). In our code this dimension is assumed to be radians FDTD unit of time. To change dimension for considered parameters, we use function calibrate. This function multiplies \(\omega_0\), \(\gamma\), \(\gamma'\)(also \(\sigma \) and \( \sigma *\)) by its argument.
In our example FDTD unit of length is 1 micron. Since \(c=1\), FDTD unit of time is time necessary for light to cover one micron. Therefore argument of function calibrate should be inverse light speed (second / micron).
There are ready approximations for some media (gold, silver, silicon, tungsten etc.) in EMTL. Corresponding functions are collected in photonic/opt_data.h. For example
emMedium au=GetAu(); // au is gold. `FDTD` unit of length is 1 micron
returns approximation for gold used above for default FDTD length unit 1 micron. If your unit of length is 0.1 micron, use
emMedium au=GetAu(0.1); // au is gold. `FDTD` unit of length is 0.1 micron
Scattering on sphere
Here we show how to simulate plane wave scattering on a sphere. This problem has analytical solution which can be used to compare with FDTD results.
The main class for numerical experiment is uiExperiment declared in photonic/uiexp.h. Lets make object of this class.
uiExperiment task;
Now we should call its functions to specify geometry, calculate and analyze results.
Calculated volume is box with opposite corner coordinates (-10,-10,-10) and (10,10,10).
task.SetInternalSpace(Vector_3(-10),Vector_3(10));
We have absorbing boundary conditions PML in all directions.
task.SetBC(BC_PML,BC_PML,BC_PML);
Mesh step dr is unity.
task.SetResolution(1);
Second arbitrary argument of SetResolution is ratio between time step and mesh step with default value 0.5 (this is good value for stability). In our case time step \(dt=0.5\), \(dr=0.5 \).
To simulate and analyze the results we should call:
    task.Calculate(200);
    task.Analyze();
Argument of Calculate is experiment duration. Since time step is 0.5, number of time iterations is \(200/0.5=400\).
Now we have the following code:
    #include "uiexp.h"
    int main(int argc, char **argv){
            emInit(argc,argv);
            uiExperiment task;
            task.SetInternalSpace(Vector_3(-10),Vector_3(10));
            task.SetBC(BC_PML,BC_PML,BC_PML);
            task.SetResolution(1);
            task.Calculate(200);
            return 0;
    }
During execution program reports the calculation status. According to this report it makes 400 iterations (it shows 399, since iterations numeration starts with 0). Also program shows mesh size for each direction. In our example this is 40x40x40. This is internal calculated volume \(10 - (-10) = 20\) and additional PML layer of 10 mesh steps (this is default value that can be change by ConfPML) at front and back boundaries.
Since mesh is initialized with zero field and there are no light sources, field is zero at each time step.
In next sections we will put plane wave source, sphere and detectors in the calculated volume. Corresponding functions of uiExperiment should be called before Calculate.
Total Field / Scattered Field
For plane wave generation we use Total Field / Scattered Field (TF/SF) method. Total Field region is box with opposite corner coordinates (-7,-7,-7) and (7,7,7).
task.AddTFSFBox(Vector_3(-7),Vector_3(7));
Incident plane wave impulse propagates in z-direction (0,0,1) and has x-polarization (1,0,0):
task.SetPlaneWave(Vector_3(0,0,1),Vector_3(1,0,0));
Impulse has Berenger shape in time domain:
task.SetSignal(new Berenger(1,25,5,125));
described by function
In our example \(E_0=1\), \(t_0=25\), \(t_w=5\), \(T=125\)
Detectors
Detectors are points where field values are recorded. Field values at these points are interpolated by mesh. Detectors record auxiliary binary files during the calculation. These files are used to produce final text files at the analysis stage.
Lets put one detector at the center of coordinates:
task.AddDetectorSet("c",Vector_3(),Vector_3(),iVector_3(1));
First parameter of AddDetectorSet is detectors name (c in our case). This name will be used for names of files associated with detectors. Next three parameters specify 3D grid where detectors are placed, namely, two opposite corners of the grid and number of grid steps along three directions. In our case grid has one point (0,0,0) only. At each time step detectors (one detector in our case) record field values at corresponding points in binary file binary.c.dat. Function Analyze will extract these values to text files.
task.Analyze()
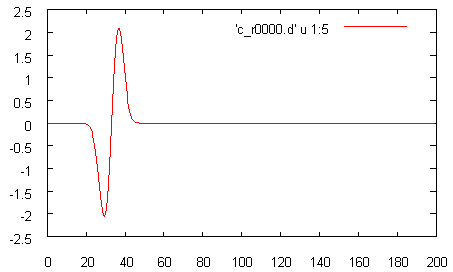
Since we have only one detector, we will obtain only one text file c_r0000.d. This file contains field time history in table format t, x, y, z, Ex, Ey, Ez, Hx, Hy, Hz.
You can plot data from this table using popular gnuplot program that can be downloaded from here.
For example, to plot Ex(t) you should open gnupolt, move to directory with c_r0000.d file using cd command (specify directory name in quotes) and type
gnuplot> p 'c_r0000.d' u 1:5 w l
You will see Berenger impulse:
You can use various bit flags as a fifth optional parameter of AddDetectorSet.
For example, to get field in frequency domain, use flag DET_F:
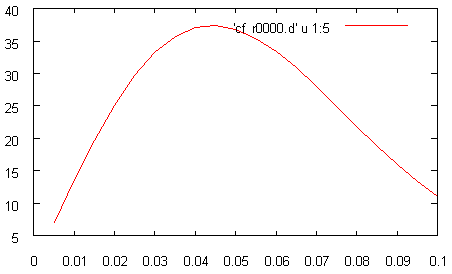
task.AddDetectorSet("cf",Vector_3(),Vector_3(),iVector_3(1),DET_F);
You will find the results in text file cf_r0000.d. Center frequency of Berenger impulse, used in our example, is 0.04 that corresponds to wavelength 25.
Movie with wave propagation
We showed above how to plot time history of the signal and its frequency representation for some chosen point. Here we will plot field distribution on grid of points.
Lets make 2D detectors grid which is parallel to xy plane and contains the center (0,0,0).
task.AddDetectorSet("f",Vector_3(-9.5),Vector_3(9.5),iVector_3(1,20,20),DET_TSTEP);
Since grid nodes number in x-direction is 1, x coordinate of all grid nodes is (-9.5+9.5)/2=0. Otherwise, x-coordinates will have values starting from x=-9.5 until x=9.5.
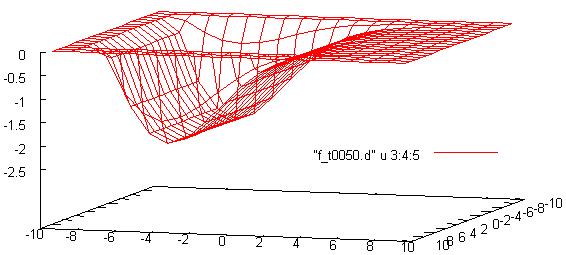
By default program create separate text files for each detector. In this regime you can see and compare time history for each detector. To create separate text files for each time step we use bit flag DET_TSTEP. In our example files have names f_txxxx.d, where xxxx is time step. Each file has field distribution on detector grid for the corresponding time step. This field distribution can be plotted using gnuplot, for example (50 time step)
gnuplot> sp 'f_t0050.d' u 3:4:5
Gnuplot can show plots for all iterations in series as a movie.
Create file film.gnu and copy these commands there
    pref="f"
    fn=sprintf("\%s\_t\%04d.d",pref,i)
    splot [][][-3:3] fn u 3:4:5 w l
    i=i+1
    if(i<iterations)reread
Then type
gnuplot> i=0; iterations=400; load 'film.gnu'
You will see how plane wave propagates in Total Field region.
To make color plot, type in gnuplot
    gnuplot> set pm3d interpolate 2,2
    gnuplot> cbr=3
    gnuplot> set palette defined (-cbr 'blue', 0 'white', cbr 'red')
    gnuplot> set cbrange [-cbr:cbr]
    gnuplot> set view 0,0
and put line
splot [][][-cbr:cbr] fn u 3:4:5 w pm3d
in film.gnu instead of previos line
splot [][][-3:3] fn u 3:4:5 w l
To store all pictures, type
gnuplot> set terminal png
and modify film.gnu
    pref="f"
    fp=sprintf("\%s\%04d.png",pref,i)
    set output fp
    fn=sprintf("\%s\_t\%04d.d",pref,i)
    splot [][][-cbr: cbr] fn u 3:4:5 w pm3d
    i=i+1
    if(i<iterations)reread
As a result gnuplot will produce 400 pictures that can be merged to avi file (for example, using program VirtualDub).
To restore display regime and leave pm3d plot style, type
    gnuplot> set terminal win
    gnuplot> unset pm3d
You can obtain field distribution in frequency domain, using two bit flags DET_F и DET_TSTEP (C operator | adds bit flags):
task.AddDetectorSet("ff",Vector_3(-9.5),Vector_3(9.5),iVector_3(1,20,20),DET_F|DET_TSTEP);
Adding an object
Lets put glass (refractive index \(n=1.45\) and dielectric permittivity \(\epsilon=n^2\)) sphere of radius 5 at the center of coordinates:
task.AddObject(emMedium(1.45*1.45),new Sphere(5,Vector_3()));
TF/SF technique works correctly if you have no less then 2 mesh steps between body and TF/SF border (7-5=2 in our case).
Now you can make movie and see how sphere scatters incident wave to Scattered Field region. After scattered wave is absorbed by PML, simulation should be finished (in our example experiment continues 200 FDTD units of time).
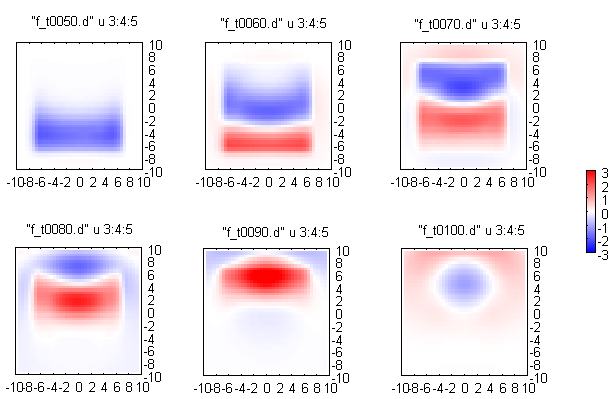
Changing plot settings you can make good movies, like this:
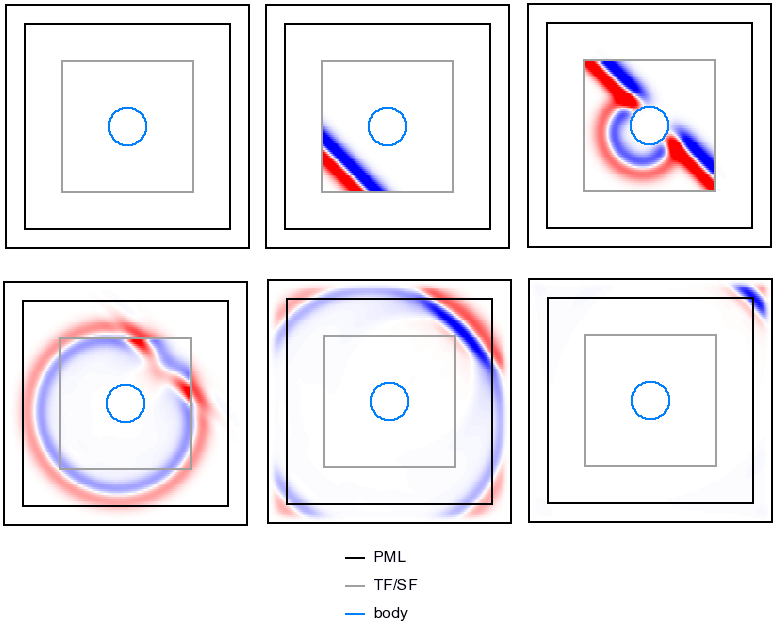
In this pictures incident wave is coming under the angle \(45^0\) relative to y and z axes. Distance between sphere, TF/SF border and PML is increased to see propagation of scattered in a larger scale.
If you use reflective boundaries, scattered field will be reflected back by boundaries and never leave calculated volume. You can check it with
task.SetBC(BC_REFL,BC_REFL,BC_REFL);
Energy flux
Before reading this section, it useful to have a look at FDTD.
FDTD allows to calculate energy flux through chosen surface. It can be surface of a box
task.AddFluxSet("flux",Vector_3(-8.5),Vector_3(8.5));
Field values at the surface are recorded by detectors which are placed at distance approximately 1 mesh step from each other.
In example above we put surface in Scattered-Field region to calculate scattered energy flux \(W_{sca}\). To measure scattered field correctly, distance between surface and TF/SF border should be more than 1 mesh step (in our case this is 8.5-7=1.5).
After analysis stage you will find text file flux.d with corresponding energy flux in frequency domain. Using this file you can calculate efficiency for scattering \(Q_{sca}\) from our glass sphere:
where
- \(W_{sca}\) is scattered energy flux
- \(I\) is incident intensity
- \(G = \pi 5^2\) is sphere cross-sectional area
To estimate incident wave intensity you can use file cf_r0000.d (frequency representation) created in vacuum experiment. Since incident wave has x-polarization, its intencity can be obtained as \(I=|\frac{1}{2}{E_x}^2|\).
Below we present comparison of results for \(Q_{sca}\) obtained with FDTD and BHMIE programs.
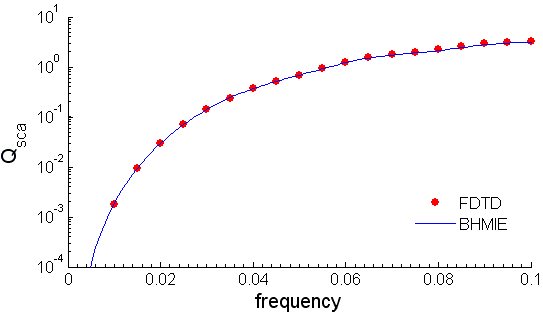
BHMIE program sums up series of analytical solution for plane wave scattering from a sphere (this solution was published by Gustav Mie in 1908). BHMIE description can be found in book here. BHMIE and some other useful programs can be downloaded from here.
How to plot specified geometry
To plot specified geometry you can use auxiliary files which are created before calculation:
- cell.pol – calculated volume
- med.pol – bodies
- pmli.pol, pmlo.pol - inner and outer PML boundaries
- tf.pol – Total Field region
- sg.vec – incident wave direction
- files with extension _vset - detectors.
Extension pol in file name means that file stores polyhedra, d - dots, а vec - vectors.
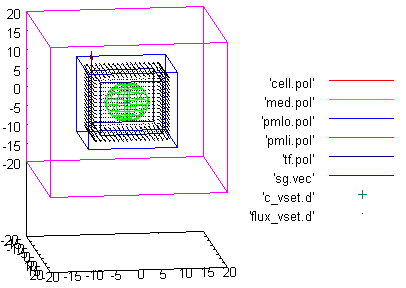
Type in gnuplot:
    gnuplot> sp 'cell.pol' w l, 'med.pol' w l, 'pmlo.pol' w l, 'pmli.pol' w l, \
    gnuplot> 'tf.pol' w l, 'sg.vec' w vec, 'c_vset.d', 'flux_vset.d' w d
to see:
Near to Far Transformation
Before reading this section, it useful to have a look at FDTD section.
Angular distribution of scattered wave is characterized by amplitude scattering matrix which connects scattered field in far zone with incident field. To calculate scattered field in far zone directly you should use large calculated volume. However, far field can be calculated in more elegant wave.
Lets surround object by closed surface in Scattered-Field region. Field is zero at this surface when simulation starts \(t=0\). During simulation \(t\ge{}0\) field value at this surface is known. It follows from Maxwell's equations that this knowledge can be used to derive field outside surface for \(t\ge{}0\). This derivation can be done using Near-to-Far-Field Transformation technique. Near to Far Transformation allows to obtain field values already in frequency domain.
Lets surround the sphere from our example by closed surface in Scattered-region Field (this surface coincides with surface already used for scattered energy flux calculation). Field at this surface will be used to calculate field at far points. We put far points at the distance 1000 from coordinates center in directions specified by angles \(\theta\) and \(\phi\). Angle \(\theta\) spans values from 0 to \(\pi\) with step \(\pi/18\), and angle \(\phi\) has values 0 and \(\pi/2\).
    Vector_3 origin;
    valtype length=1000; // distance from the origin to far points
    valtype th0=0,th1=M_PI;
    valtype fi0=0,fi1=M_PI/2;
    int thn=19,fin=2;
    task.AddNearToFarSet("far",Vector_3(-8.5),Vector_3(8.5),origin,length,th0,th1,thn,fi0,fi1,fin,DET_TSTEP);
After analysis you will find files far_xxxx.d, where xxxx is frequency number. Components of the fields \(\bf E\) and \(\bf H\) correspond to orthonormal basis associated with the spherical polar coordinate system \((r, \theta, \phi)\) (see comments FDTD section). Lets look at field values in this file closely.
First, \(E_r\) is almost zero since far field is transverse.
Second, \(E_{\phi}\) is almost zero for \(\phi=0\), and \(E_{\theta}\) is almost to zero for \(\phi=\pi/2\). This is because nondiagonal elements of amplitude scattering matrix for sphere are zeros \(S_3=S_4=0\).
Note that amplitude scattering matrix elements \(S_1, S_2\) do not depend on \(\phi\) for sphere.
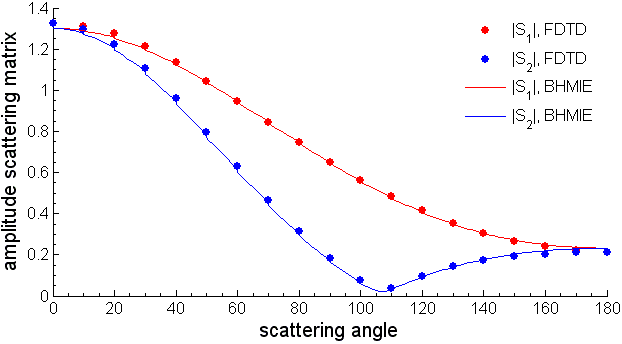
Using absolute values \(E_x\) of incident wave from vacuum results in cf_r0000.d, we can calculate absolute values of elements \(\left|S_1\right|, \left|S_2\right|\) (see FDTD section).
Below we present comparison between FDTD and BHMIE results for frequency \(f=0.05\). While angle \(\theta\) tends to \(\pi\) accuracy of Near to Far Transformation technique decreases (this is so called Backscattering Problem).
Stages of work
There are three stages of uiExperiment work:
Geometry initialization. At this stage you specify calculated volume size, mesh steps, boundary conditions and add bodies, sources and detectors Calculation (function Calculate) Analysis (function Analyze). Here binary detectors files are analyzed and final text files are produced
Sometimes it makes sense to run some stages separately. It can be done using function SetPhases with "g", "c" or "a" as an argument. For example, you can call
task.SetPhases("g");
to run geometry initialization stage only. This option is useful if you want to see geometry in gnuplot without calculation (to check if geometry is correct).
Value "c" corresponds to geometry and calculation stages. Use it if you want to analyse binary detectors files later (for example, you if want to restart the parallel version of the program with different processors amount at analysis stage). To run Analysis stage only use flag "a".
Transmission and reflection from periodic structures
FDTD can be used to calculate transmittance and reflectance spectra for arbitrary periodic structures (photonic crystal slabs, antenna arrays, etc.) Transmission and reflection can be obtained by simulation of the time-limited impulse propagation through the considered structure. To simulate periodicity in corresponding direction a single unit cell with periodic boundary conditions may be simulated.
We illustrate it below for single unit cell of photonic crystal slab, consisting of a square lattice of spheres. Unit cell is confined by periodic boundaries 1 and 2. Total Field region is shaded with dashed lines. The virtual Total Field / Scattered Field (TF/SF) surface 3 generates incident plane wave impulse impinging the cell. Absorbing boundary conditions PML are used for non-periodical direction and absorb the reflected and transmitted waves modeling their withdrawal to the infinity. Total exit of the radiation from the structure determines the simulation time. Transmitted and reflected waves are recorded during numerical experiment, transformed to the frequency domain and normalized to the incident spectrum, to calculate transmittance (reflectance).
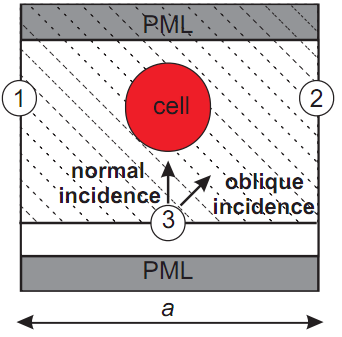
At the normal incidence periodic boundary conditions take a form
where \(\bf F\) is electric or magnetic field ( \(\bf E\) or \(\bf H\)), \(\bf a\) is lattice translation vector parallel to the structure surface, \(\bf x\) and \(t\) are coordinates in space in time.
Periodic boundary conditions at oblique incidence case contain a time shift. In 2D they take form (generalization for 3D case is straightforward)
where \(\theta\) is the angle of incidence, \(c\) - speed of light in the incident medium. Meaning this expression can be clarified from the figure above. Oblique wave impulse comes to the border periodic 1 earlier than to the periodic border 2. Therefore field values at these borders are shifted in time. Using periodic boundary conditions require knowledge of retarded field values at the border 1 (for applying at the border 2) and advanced field values at the border 2 (for applying at the border 1). Retarded fields can be picked up from a recorded wave propagation. Obtaining the advanced fields constitutes a problem since they are unknown during numerical experiment. One way to solve this problem is to use iterative technique for analysis of periodic structures at oblique incidence.
In the following we consider how to simulate normal incidence case on some simple one-dimensional examples, then we explain work principle of our iterative technique, and finally we show how to use it on examples of photonic crystal slab and antireflective textured coating.
Infinite film
Here show how to calculate transmittance and reflectance spectra for the infinite film (which can be considered as periodic with zero period) at normal incidence.
Lets make object of the class uiExperiment:
uiExperiment task;
The film will be infinite in x and y directions and finite in z direction.
Size of the calculated volume in z direction is 3. Mesh step is 0.05. We use absorbing boundary conditions PML in z direction.
    task.SetInternalSpace(Vector_3(0,0,0),Vector_3(0,0,3));
    task.SetResolution(0.05,1);
    task.SetBC(BC_PER,BC_PER,BC_PML);
We consider one dimensional problem (the only working dimension is z) and specify zero size of the calculated volume in x and y directions. Boundary conditions along x and y directions are periodic. Note that actual width of the calculated volume along these directions will be equal 2 mesh steps.
Courant factor should be equal or less than \(1/\sqrt{D}\), where \(D\) is dimensionality of the problem. We use Courant factor 1 (this is the second argument of SetResolution), since our problem is one dimensional. We could take smaller Courant factor value, but it will lead to smaller time step.
Incident electromagnetic impulse propagates in z direction. To generate this impulse we specify Total Field region as a half-space confined by the plane perpendicular to z axis and crossing this axis at the coordinate 0.5.
task.AddTFSFPlane(INF,INF,0.5);
Incident plane impulse propagates along z direction and is polarized in x direction.
task.SetPlaneWave(Vector_3(0,0,1),Vector_3(1,0,0));
In the previous example (scattering on sphere) we were using Berenger shape of the incident impulse and specify its parameters explicitly. In this example we use default incident impulse which has Berenger shape with some predefined parameters. These parameters are chosen in such a way that frequency representation of the incident impulse covers wavelengths that are resolved by 10 or more mesh steps.
Lets put one detector in Scattered Field region (before the film) and one detector in Total Field region (after the film).
task.AddDetectorSet("h",Vector_3(0,0,0.25),Vector_3(0,0,2.75),iVector_3(1,1,2));
To calculate energy flux for reflected and transmitted wave we use two surfaces perpendicular to z direction and crossing z axis at the coordinates 0.25 and 2.75.
task.AddRTASet("flux",2,0.25,2.75);
Directions in EMTL are numbered in the following order: x, y, z (0, 1, 2). Second argument of AddRTASet corresponds to z.
Lets run a simulation
    task.Calculate(100);
    task.Analyze();
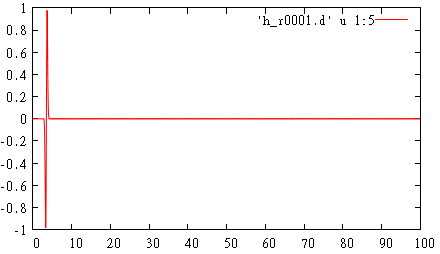
During simulation TF/SF border generates plane impulse which propagates in z direction and get absorbed by PML. Detector in Total Field region records propagating incident wave
gnuplot> p 'h_r0001.d' u 1:5 w l
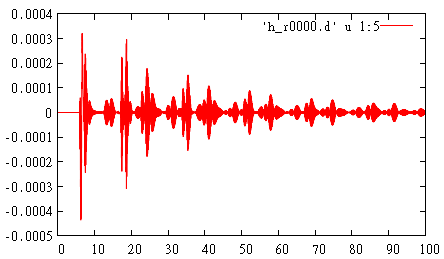
Detector in Scattered Field region records wave reflected from PML which has an order of 1е-4 from the incident wave (absorbing boundary conditions PML are not perfect and reflect something). However, wave reflected from PML is small enough and does not influence physical results.
gnuplot> p 'h_r0000.d' u 1:5 w l
In the file flux.d you can find energy fluxes for reflected, incident and transmitted waves correspondingly. Incident energy flux is calculated automatically using incident impulse shape. Using these fluxes you can plot reflectance and transmittance spectra
gnuplot> p [][-.1:1.1] 'flux.d' u 1:($2/$3) w l t 'R', 'flux.d' u 1:($4/$3) w l t 'T'
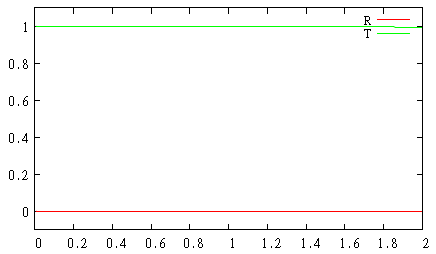
Since we were simulating wave propagation in vacuum, reflectance is 0 and transmittance is 1.
Lets specify a film
    emMedium M(2.25);
    M.AddPolarizability(emLorentz(1.1*(2*M_PI), 1e-5*(2*M_PI), .5));
    M.AddPolarizability(emLorentz(.5*(2*M_PI), .1*(2*M_PI), 2*1e-5));

    task.AddObject(M,GetPlate(Vector_3(0,0,1),Vector_3(0,0,1),1));
We use function GetPlate, where first argument is direction perpendicular to the film surface (z), second argument is some point at the one of the surfaces of the film and third point is the film width (1). Film is made from dispersive medium described by two chosen Lorentz terms.
After repeating simulation with the film, we get the following reflectance and transmittance spectra (absorption can be calculated as 1 - R - T)
gnuplot> p 'flux.d' u 1:($2/$3) w l t 'R', 'flux.d' u 1:($4/$3) w l t 'T'
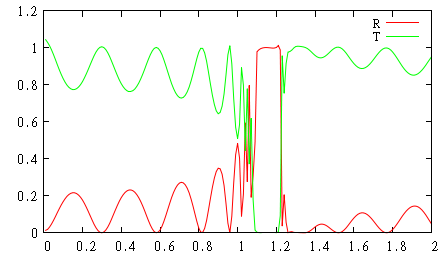
Results for small frequencies are less accurate (transmittance is more than 1). It can be fixed using Berenger shape with larger time duration in order to cover better low frequencies.
task.SetSignal(new Berenger(1,2.5,.5,12.5));
Corresponding results will improve for low frequencies but will become worse for high frequencies (you can check it).
Note that distance between body, TF/SF border, PML and detectors should be not less than 2 mesh steps. In our example we keep bigger distances (5-20 mesh steps), since sometimes it can slightly improve results.
Silicon substrate
Here we calculate reflectance from semi-infinite silicon substrate at normal incidence. We use vacuum setup from previous subsection and put substrate instead of film there.
task.AddObject(getSi(.1),GetHalfSpace(Vector_3(0,0,1), Vector_3(0,0,1)));
To specify substrate we use function GetHalfSpace. Its first argument is direction perpendicular to the substrate surface (z) and second argument is some chosen point at this surface. In our model substrate is extended to PML that models its infinity.
To get object emMedium for silicon we use function getSi which has only one parameter (1 by default). This parameter specifies FDTD unit of length in microns. Using of this parameter is necessary to calibrate coefficients in Lorentz and other terms Media. In our case FDTD unit of length is 0.1 microns.
Parameters used to fit silicon dielectric function were calculated using MatLab program that can be downloaded here.
By default, UPML (Uniaxial PML) is used in the simulations. However, only dielectric media could be extended there. Since we use dispersive substrate (silicon), we need to use CPML (Convolutional PML). CPML works slower than UPML, but allows to extend any arbitrary (not only dielectric) media inside itself.
task.SetPMLType(CPML_TYPE);
Lets plot reflectance of silicon substrate as a function of wavelength in microns
    gnuplot> set xlabel 'wavelength, um'
    gnuplot> p [.3:1][0:1] 'flux.d' u (.1/$1):($2/$3) w l t 'R'
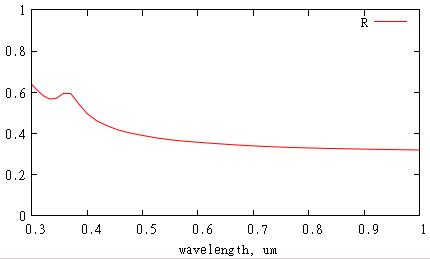
One can see that silicon reflects around 40% of visible light. For reflection reduction, can be used here.
Oblique incidence
Here we describe iterative technique for analysis of periodic structures at oblique incidence. Our technique implies performing several FDTD numerical experiments, which we call iterations later on. Field values at the periodic boundaries are recorded during each iteration. It gives the key to solution of the problem with advanced field values: even if they are unknown at the current iteration, they are known at the previous one since field history have been recorded. Field values from previous iteration can be used at the current iteration as an advanced fields by applying time shift in future. To manage this iterative process we use "soft" total field/scattered field (TF/SF) correction instead of "strong" periodic conditions. This TF/SF correction acts like periodic conditions after number of iterations required for convergence.
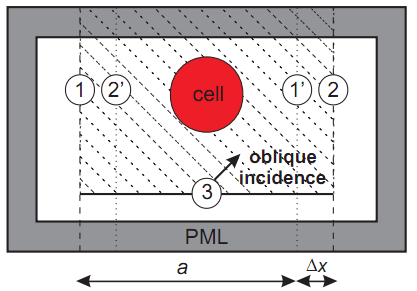
We illustrate work of our method for single unit cell of photonic crystal slab, consisting of a square lattice of spheres. We use the total field/scattered field (TF/SF) technique to generate a wave inside the total field region, shown shaded in the scheme. The time-dependent TF/SF boundary condition at the border 3 represents the obliquely incident plane wave and is known analytically. The main idea of our technique is to apply additional TF/SF-like wave generation at the side borders \({\bf x}_1\) and \({\bf x}_2\) of the unit cell using time-shifted field evolution obtained from the image points \({\bf x}_{1'}={\bf x}_1+{\bf a}\) and \({\bf x}_{2'}={\bf x}_2-{\bf a}\). For the negative time shift (data from the past), the fields from current iteration \(i\) may be used, while for the time-advanced fields we use the recorded evolution from the previous iteration:
The distance between borders 1 and 2 is taken greater than \(a\) by some span \(\Delta x\) of several mesh steps to separate image points and the TF/SF borders.
To record \({\bf E}({\bf x}_1,t)\) and \({\bf H}({\bf x}_1,t)\), we use special memory buffer. As the initial boundary condition for the first iteration, zero (no signal) is taken at the borders 1 and 2.
Our method is well described in the this paper.
Oblique iterative method is activated by function SetOblique. First parameter of this function is number of iterations. Second parameter (lets call it n) correspond to detectors: detectors are working and being analyzed at each n iteration and at the final iteration. Resulted text files from intermediate (not final) iterations are marked by suffix "_i" (i is iteration number) after detector name.
Below we present example of oblique incidence calculation for vacuum two-dimensional case (size of the calculated volume in x dimension is zero).
    #include "uiexp.h"

    int main(int argc,char **argv){

    emInit(argc,argv);
    uiExperiment task;

    task.SetInternalSpace(Vector_3(.5,0,0),Vector_3(.5,2,3));
    task.SetResolution(.05);
    task.SetBC(BC_PER,BC_PER,BC_PML);

    theta=45*M_PI/180.; // angle of incidence, radians. theta=0 corresponds to normal incidence
    Vector_3 k=Vector_3(0,sin(theta),cos(theta)); // light propagation direction
    Vector_3 E(1,0,0); // s polarization
    Vector_3 E(0,cos(theta),-sin(theta)); // p polarization

    task.AddTFSFPlane(INF,INF,.5);
    task.SetPlaneWave(k,E);
    task.SetOblique(10,1); // comment it for normal incidence

    task.BuildDimensions();

    Vector_3 p1,p2;
    task.GetSpace(p1,p2);
    Vector_3 mv1=p1+.05, mv2=p2-.05; // one mesh step from the calculated volume border
    mv1[0]=mv2[0]=(p1[0]+p2[0])/2;
    task.AddDetectorSet("movie",mv1,mv2,INT_INFTY,DET_TSTEP);

    task.CalculateN(300);

    task.Analyze();

    return 0;
}
Note that the actual size of the calculated volume is bigger than size defined by the function SetInternalSpace. This size includes PML and space to the left to the border 1 and to the right to the border 2. In order to get this size we use function GetSize.
To illustrate the convergence of the method, we put detectors "movie" throughout the actual calculated space. During numerical experiment we will get bunch of files moviexx_tyyyy.d, where xx is the iteration number and yyyy is time step. Using these files, we can plot field distribution at different time steps for different iterations.
    gnuplot> set pm3d interpolate 2,2
    gnuplot> cbr=1.3
    gnuplot> set palette defined (-cbr 'blue', 0 'white', cbr 'red')
    gnuplot> set cbrange [-cbr:cbr]
    gnuplot> set view 0,0
    gnuplot> sp 'movie01_t0160.d' u 3:4:5 w pm3d
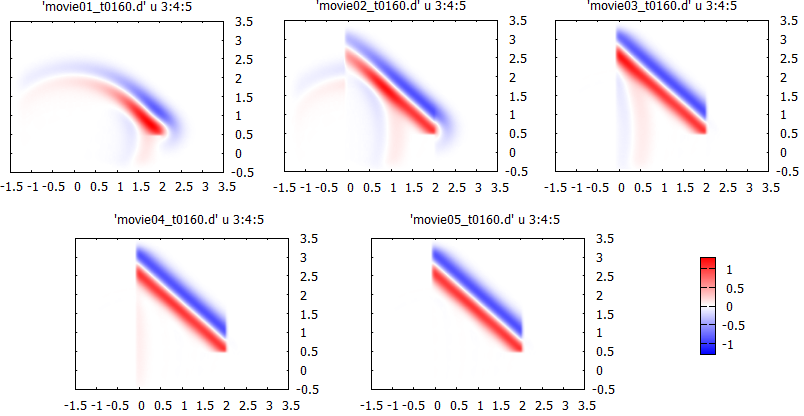
One can see field distribution at time step 160 converges to the solution (plane impulse in vacuum) for the first 5 iterations. To get the solution at later time steps, more iterations are required.
Photonic crystal slab
Photonic crystal slab is structure finite in one direction and periodic in other directions. Here we simulate photonic crystal monolayer, consisting of a square lattice of metal spheres ( \(\epsilon=4\), \(\sigma=2\)). Lattice period is set to \(a=1\), sphere radius to \(R=0.375\) and mesh space step to 0.025.
    #include "uiexp.h"

    int main(int argc,char **argv){

    emInit(argc,argv);

    uiExperiment task;
    task.SetInternalSpace(0,Vector_3(1,1,3));
    task.SetResolution(.025);
    task.SetBC(BC_PER,BC_PER,BC_PML);

    valtype theta=45*M_PI/180.; // angle of incidence, radians. theta=0 corresponds to normal incidence
    Vector_3 k(0,sin(theta),cos(theta));
    Vector_3 E(1,0,0); // s polarization, Vector_3 E(0,cos(theta),-sin(theta)); p polarization

    task.AddTFSFPlane(INF,INF,.5);
    task.SetPlaneWave(k,E);
    task.SetOblique(100,1);

    task.AddObject(emMedium(4,2),new Sphere(.375,Vector_3(.5,.5,1.5)));

    task.AddDetectorSet("h",Vector_3(.5,.5,0.25),Vector_3(.5,.5,2.75),iVector_3(1,1,2));
    task.AddRTASet("flux",2,0.25,2.75);

    task.CalculateN(2000);

    task.Analyze();

    return 0;
    }
You can plot specified geometry in gnuplot:
    gnuplot> sp 'cell.pol' w l, 'med.pol' w l, 'pmlo.pol' w l, 'pmli.pol' w l, \
    gnuplot> 'tf.pol' w l, 'sg.vec' w vec, 'itf.pol' w l, 'unit.pol' w l
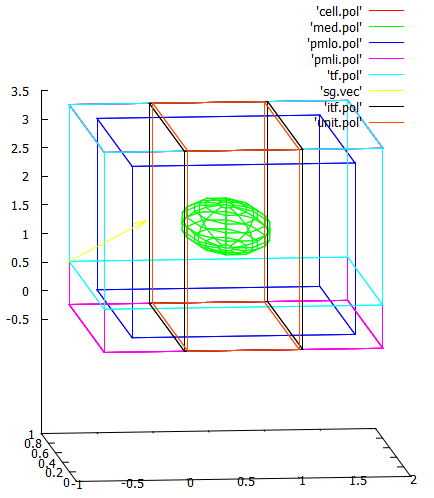
According to the picture above, itf.pol corresponds to borders 1 and 2, and unit.pol corresponds to the periodic cell of the width a (border in between 1 and 2', and border in between 1' and 2).
This is comparison for transmittance calculated by FDTD and semi-analytical layer Korringa-Kohn-Rostoker (LKKR) method.
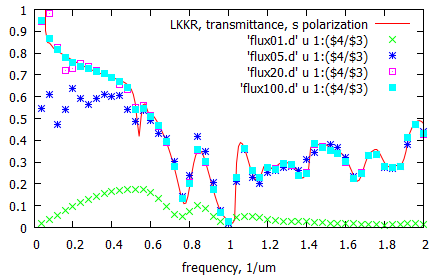
One can see that results for higher frequencies converges faster. 5-10 iterations is enough to get the idea of the transmittance spectrum curve shape. However, to obtain the exact value for transmittance 100 iterations is required. Number of iterations required for convergence is proportional to number of time steps in one iteration (in our example this is 2000).
Oblique incidence: finite spatial pulse
Before we were modeling propagation of plane wave through photonic crystal for the case of oblique incidence. Here we model finite spatial pulse generaged by chain of point dipoles separated by half of the wavelength. Phase shift between dipoles is set in order to excite wave propagating in given direction. Generated light is incident on a semi-infinite 2D photonic crystal consisting of a triangular lattice of dielectric rods in an air background. The dielectric constant is 12.96, the radius of rod is 0.35, the lattice constant is 1.
    int main(int argc,char **argv){

    emInit(argc,argv);
    uiExperiment task;

    valtype dr=.1; // mesh step
    int ynum=50; // number of pc layers in y-direction
    int znum=20; // number of pc layers in z-direction
    valtype dypc=.5; // distance between pml and left (right)rod
    valtype dzpc=.2; // distance between pml and top rod
    valtype space=15; // distance between tf/sf border and pc
    valtype tf=10*dr; // tf/sf border position

    valtype R=.35; // radius of rods
    emMedium med(12.96); // material of rods

    valtype lambda=1./.57; // incident wavelength

    valtype y=ynum-1+2*dypc+2*R, z=tf+space+znum*sqrt(3.)+R+dzpc; // calculated volume
    task.SetInternalSpace(0,Vector_3(0,y,z));
    task.SetBC(BC_PML,BC_PML,BC_PML);
    task.SetResolution(dr);

    for(int k=0;k<znum;k++){ // pc triangular lattice
            Vector_3 pos;
            pos[2]=tf+space+R+k*sqrt(3.);
            for(int j=0;j<ynum;j++){
                    pos[1]=dypc+R+j;
                    task.AddObject(med,GetCylinder(pos,Vector_3(1,0,0),R));
            }
            pos[2]=tf+space+R+(k+.5)*sqrt(3.);
            for(int j=0;j<ynum-1;j++){
                    pos[1]=dypc+R+j+.5;
                    task.AddObject(med,GetCylinder(pos,Vector_3(1,0,0),R));
            }
    }

    task.AddTFSFPlane(VEC_INFTY,VEC_INFTY,tf); // tf/sf border

    valtype phi=30.*M_PI/180; // incidence angle
    \Vector_3 n(0,sin(phi),cos(phi)); // propagation direction
    Vector_3 mom=n%Vector_3(1,0,0); // dipole moment
    int num=10; // number of point dipoles
    valtype l=(num-1)*.5*lambda; // length occupied by point dipoles
distance between tf/sf border and closest point dipole (shouldn't be small to avoid possible near field problems):
    valtype dip_dist=lambda*.5;

    for(int i=0;i<num;i++){
            Vector_3 pos;
            valtype phase=0;
            if(num){
                    pos=Vector_3(0,y/2-dip_dist*tan(phi),tf-dip_dist)+(i/valtype(num-1)-.5)*l*Vector_3(0,1,0);
                    phase=i/valtype(num-1)*l*sin(phi);
            }
    else
            pos=Vector_3(0,y/2-dip_dist*tan(phi),tf-dip_dist);

    if(pos[2]>=tf){
            return -1; // dipole is placed in the scattered field region
            }
    task.AddTFSFDipole(pos,mom,phase);
    }

    task.SetSignal(new PartOfSinus(1,2.*M_PI/lambda,dip_dist ? -dip_dist+5*dr : 0,VEC_INFTY));

    valtype rsl=.25; // detectors grid resolution compare to the mesh step

    Detectors grid:

    Vector_3 f1(0,-9.5*dr,-9.5*dr);
    Vector_3 f2(0,y+9.5*dr,z+9.5*dr);
    iVector_3 fn(1,int(acdiv(y,dr/rsl)+20*rsl),int(acdiv(z,dr/rsl)+20*rsl));

    task.AddDetectorSet("s",f1,f2,fn,DET_TSTEP); // time domain
    task.GetDetectorSet("s")->SetOutBitFlags(outE|outH|outE2);
    task.GetDetectorSet("s")->SetUpdateFrequency(500);

    task.CalculateN(10000);

    task.Analyze();
    return 0;
    }
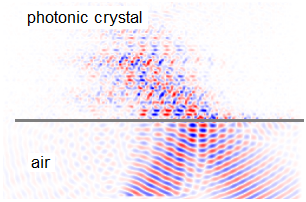
This is a snapshot of magnetic field after 5000 iterations. One can observe negative refraction experienced by light propagating through photonic crystal.
